I decided to make lasagne today a few days ago. I was worried it would be too hot out and it wouldn't be a great dinner. (warm oven hot day yuck) Turns out it is a perfect day!
Here is the 'recipe' for " My (dutch) moms meat lasagne"
I say 'recipe' in quotes because I learned by watching her, not by anything written down. I've also tweaked it from how she does it too...
Ingredients:
a sploosh of olive oil
one small onion, diced
several cloves of garlic, chopped/crushed/pressed/grated
half to one pack of ground beef
tsp or so dried basil, or oregano or majorim
a good sprinkle of cayenne pepper (we liked it spicy)
oh...a cup or 2 of mushrooms, sliced
one small/medium zucchini, grated
half to one green, red, yellow or orange sweet pepper chopped (I don't like peppers, so I don't add them, but my mom always made the peppers bigger so I could pick them out and put them on her plate, although with lasagne, it was hard, so I got them down ok)
can of whole, or puréed tomatoes (if whole, blend with a blender stick...my mom used to blend the garlic here, instead of chop it up)
tub of cottage cheese
one egg
pack of baby spinach, or bag of spinach, or pack of frozen spinach
9 lasagne noodles
half a big block mozzarella cheese, grated
-heat olive oil in a medium pot, medium heat, add onions and garlic, and cook a little, until fragrant
-add ground beef and spices and cook 'til done
-add mushrooms, zucchini and peppers and cook for a few minutes
-add can of tomatos
-bring to boil and turn down to second lowest to simmer until mushrooms are cooked
Meanwhile,
-boil water for noodles. cook until el dente.
-put spinach into colander and poor noodles and cooking water on top to wilt spinach. (my mom boiled water, and wilted the spinach separately, but this saves time and energy and water)
- pour cold water over noodles and spinach
- put cottage cheese in bowl and add egg (the egg holds it all together), stir in cooled wilted spinach.
- in a deep rectangle baking pan, put a thin layer of sauce, layer on 3 noodles
-add cottage cheese mix, and 3 more noodles
-a thick layer of sauce, and 3 more noodles
-evenly spread grated mozzarella
At this point you can refrigerate it, or if in an aluminium pan, freeze it. Or turn the oven on to 350 let it heat up and pop it in until you feel it's done...yea, I go by smell, half an hour to an hour? make sure the egg is cooked in the cottage cheese layer. Turn the oven to broil and brown the top.
The most important and hardest part is LET IT SIT! It needs to gel again. Kinda like allowing meat to sit.
(pics to follow once it's out of the oven...I didn't think to write this post until it was too late!)

Showing posts with label tutorial. Show all posts
Showing posts with label tutorial. Show all posts
Monday, April 30, 2012


Saturday, March 10, 2012
hooked, a tutorial
go me.
I'm planning on going to the St. Lawrence antique market to get another motley set of hooks for the other 3 4x4s.
Drill pilot holes first so you don't split the wood, and use anchor sets so you don't pull the set up off the wall when you put you worn but not dirty clothes on it.


Friday, January 27, 2012
ghasp...
This is not a post about pregnancy.
I made nut butter today! So easy!
1. Get some nuts. Whatever nuts you like. Almonds, cashews, hazelnuts...use one type or use them all. Use seeds, like pumpkin or sunflower. I choose to use raw, because according to Oprah, and well, actual experts, when you roast nuts you change the really GOOD fat into TRANS fat *buh buh buh*.
2. Put them in a food processor. A little less than the height shaft of the blade bit. I added, like a half tsp. of salt. I think it might be too much...but then, I always get unsalted peanut butter.
3. Stick the lid on, and buzz away. It will crumble, then turn kinda dough like. Keep and eye on it and scrape down the sides. Keep buzzing til it's how you like it. 10 or so minutes? I forget to time it...another tutorial said 15...but there is no way it took that long.
4. Stick it on a jar, or tupperware or make a sandwich.
5. The oils will naturally separate, just give it a stir before you use it if it does. Oh and keep it in the fridge so it won't go rancid as fast.


I made nut butter today! So easy!
1. Get some nuts. Whatever nuts you like. Almonds, cashews, hazelnuts...use one type or use them all. Use seeds, like pumpkin or sunflower. I choose to use raw, because according to Oprah, and well, actual experts, when you roast nuts you change the really GOOD fat into TRANS fat *buh buh buh*.
2. Put them in a food processor. A little less than the height shaft of the blade bit. I added, like a half tsp. of salt. I think it might be too much...but then, I always get unsalted peanut butter.
3. Stick the lid on, and buzz away. It will crumble, then turn kinda dough like. Keep and eye on it and scrape down the sides. Keep buzzing til it's how you like it. 10 or so minutes? I forget to time it...another tutorial said 15...but there is no way it took that long.
4. Stick it on a jar, or tupperware or make a sandwich.
5. The oils will naturally separate, just give it a stir before you use it if it does. Oh and keep it in the fridge so it won't go rancid as fast.


Saturday, November 19, 2011
Christmas making
So, like last year, I can't really talk about a lot of the gifts I'm making here, at least not *before* Christmas...someone might not be surprised!
So, in the mean time, until I can reveal what I'm making, here are a few posts from last Chrismas that might inspire your making this year!
Here is the tutorial for the bodum cozy. I made one for my mom, J and my dad. They all though it was great!
http://beccasnb.blogspot.com/2011/03/tutorialthursday-french-press-cozy.html
Maybe someone would like a home made day planner?
http://beccasnb.blogspot.com/2011/01/day-planner.html
some of the things I made/bought last year
http://beccasnb.blogspot.com/2010/12/giftmas-roll-call.html
and some photos of what I made
http://beccasnb.blogspot.com/2010/12/holiday-making-share.html
http://beccasnb.blogspot.com/2011/01/pom-pom.html
I thought I did a tutorial for the leg warmers. hrrm.
any who. keep your eyes peeled for a few Christmas making posts! Not everyone is reading this (I hope!)
So, in the mean time, until I can reveal what I'm making, here are a few posts from last Chrismas that might inspire your making this year!
Here is the tutorial for the bodum cozy. I made one for my mom, J and my dad. They all though it was great!
http://beccasnb.blogspot.com/2011/03/tutorialthursday-french-press-cozy.html
Maybe someone would like a home made day planner?
http://beccasnb.blogspot.com/2011/01/day-planner.html
some of the things I made/bought last year
http://beccasnb.blogspot.com/2010/12/giftmas-roll-call.html
and some photos of what I made
http://beccasnb.blogspot.com/2010/12/holiday-making-share.html
http://beccasnb.blogspot.com/2011/01/pom-pom.html
I thought I did a tutorial for the leg warmers. hrrm.
any who. keep your eyes peeled for a few Christmas making posts! Not everyone is reading this (I hope!)
Wednesday, November 2, 2011
workshop wednesday
reusing...or 'upcycling' socks.
I have a bag of lost socks. J has a heavy heel, producing holes in the heel of socks, leaving the rest unworn. I have trouble throwing these items out. I have trouble throwing perceived still usable items out in general. Yes, even socks with heel holes. I suppose darning is an option, but these are 'sport' socks...
We had sometimes used socks as dusters.
And then, I got my wild idea.
Cloths.

I haven't figured out what to do with the toes, heels and tops though haha.
I have a bag of lost socks. J has a heavy heel, producing holes in the heel of socks, leaving the rest unworn. I have trouble throwing these items out. I have trouble throwing perceived still usable items out in general. Yes, even socks with heel holes. I suppose darning is an option, but these are 'sport' socks...
We had sometimes used socks as dusters.
And then, I got my wild idea.
Cloths.
 |
| miss matched and holey socks |
 |
| cut off the toe, heel and top |
 |
| I cut through the bottom of the sock top make better use of the less worn top |

I haven't figured out what to do with the toes, heels and tops though haha.
Thursday, March 10, 2011
tutorial...THURSDAY! French Press Cozy
I talked about a Christmas present I made for J, a french press/Bodum cover/cozy. I made one this week for my Dad's Christmas present (He was away for 2 months, over Christmas, we're celebrating this weekend)

Things you'll need:
-an old felted/shrunken wool sweater, or something for insulation
-fabric
-elastic
-3 buttons


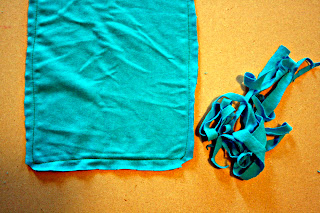


Things you'll need:
-an old felted/shrunken wool sweater, or something for insulation
-fabric
-elastic
-3 buttons
First, measure your FP. Add 2cm to the length. um...I didn't measure...what I did was use the one I made for J as a template...once you make one, most FPs should be the same around...We have a short one too, but all we do is flip down the top!
Cut the felted sweater to size.
Lay on chosen fabric.

Cut Fabric about 2 or 3 cm bigger than felt.

Pin both long and one short side, using felt as a guide (NOT pinning TO fabric)

Sew along the edge, the size of the felt, and trim off edges.

Flip right side out and slide the felt in. Tuck the cut ends in, and pin 3 loops of elastic inside.

Sew all around the edges, and 'quilt' the middle. This will keep the felt from moving around.

Sew 3 buttons on the nice side, opposite the loops.
Now you will have hot coffee for a little longer!
Tuesday, February 15, 2011
tutorial Tuesday?
ooops...I didn't prepare anything today...
why don't I tell you how I make my chicken stock?
There won't be any photos yet...I'll maybe add them in another day.
I call my chicken "triple threat chicken". It acts, sings and dances!
wait...no. It roasts, simmers and soups!
To make my stock, first I roast a chicken. (a tutorial for another day!?)
Then we eat the chicken breasts with some sort of steamed green veg, maybe some rice, or potato.
Right now it's only the two of us, so that idea works well...'cause you can't eat more than that if it's going to be a triple threat.
With the rest of the meat, the legs, I make a curry, or burritos.
DO NOT THROW OUT THE BONES/FAT/JUICES/CRUNCHY BAKED ON BITS/SKIN of your roast. I just shove the whole roasting pan with the bones in the fridge after it's roasted. Toss the leg bones back in the roasting pan on day 2. If I have time, I make the stock on day 2. Sometimes I don't, and I can make the stock on day 3. Stop being so paranoid J...it's FINE...especially if I'm going to BOIL THE HECK out of it... (ahem, pardon me, my hubby is paranoid about food...he won't eat leftovers if they've been in the fridge for more than a day...if he eats them at all)
Now...If I know I can't get to making stock asap, I stick the bones and juices in the freezer.
Stick the bones, juices, fats, skin in a big pot. Add 2 or 3 carrots snapped in half, a few stocks of celery snapped in half...thick white bits, leaves and all (yes, I do wash the dirt off), add a couple onions, skins and all, quartered. Sometimes I add herbs...sometimes coriander. Whatever you like really... oh, salt and pepper too.
Fill the roasting pan with water. Take a spoon and scrape up all that yummy baked on chicken! Pour it over the stuff in your pot. Keep using the roasting pan to add water until you have covered the bones and Veg. now BOIL. When it gets crazy, put the pot on simmer. I say it's done when the carrots are soft...I've never timed it. I turn off the heat, and let the pot cool all day or over night. LID ON. Not refrigerated. I dunno, is that bad? lol. I heard from someone never to put hot food in the fridge. Something about bacteria thriving...
Once it's cooled enough I strain it stock, either into another pot if I'm about to make soup, or into big tupperware and into the freezer. If you are freezing it, leave a good 5 cm at the top for the stock to expand into.
why don't I tell you how I make my chicken stock?
There won't be any photos yet...I'll maybe add them in another day.
I call my chicken "triple threat chicken". It acts, sings and dances!
wait...no. It roasts, simmers and soups!
To make my stock, first I roast a chicken. (a tutorial for another day!?)
Then we eat the chicken breasts with some sort of steamed green veg, maybe some rice, or potato.
Right now it's only the two of us, so that idea works well...'cause you can't eat more than that if it's going to be a triple threat.
With the rest of the meat, the legs, I make a curry, or burritos.
DO NOT THROW OUT THE BONES/FAT/JUICES/CRUNCHY BAKED ON BITS/SKIN of your roast. I just shove the whole roasting pan with the bones in the fridge after it's roasted. Toss the leg bones back in the roasting pan on day 2. If I have time, I make the stock on day 2. Sometimes I don't, and I can make the stock on day 3. Stop being so paranoid J...it's FINE...especially if I'm going to BOIL THE HECK out of it... (ahem, pardon me, my hubby is paranoid about food...he won't eat leftovers if they've been in the fridge for more than a day...if he eats them at all)
Now...If I know I can't get to making stock asap, I stick the bones and juices in the freezer.
Stick the bones, juices, fats, skin in a big pot. Add 2 or 3 carrots snapped in half, a few stocks of celery snapped in half...thick white bits, leaves and all (yes, I do wash the dirt off), add a couple onions, skins and all, quartered. Sometimes I add herbs...sometimes coriander. Whatever you like really... oh, salt and pepper too.
Fill the roasting pan with water. Take a spoon and scrape up all that yummy baked on chicken! Pour it over the stuff in your pot. Keep using the roasting pan to add water until you have covered the bones and Veg. now BOIL. When it gets crazy, put the pot on simmer. I say it's done when the carrots are soft...I've never timed it. I turn off the heat, and let the pot cool all day or over night. LID ON. Not refrigerated. I dunno, is that bad? lol. I heard from someone never to put hot food in the fridge. Something about bacteria thriving...
Once it's cooled enough I strain it stock, either into another pot if I'm about to make soup, or into big tupperware and into the freezer. If you are freezing it, leave a good 5 cm at the top for the stock to expand into.
Tuesday, February 8, 2011
tutorial Tuesday - Kim Chi!
Tuesdays have been named Tutorial Tuesdays!
It is my hope to post a tutorial once a week.
From cooking to crafting to gardening to space travel...
today...KIM CHI!
J (the husband) took up to Korean BBQ.
Have you ever been?
It's all you can eat grilled meat and fish. they give you sides of kim chi (kim chee, kimchi), spicy potatos, and rice. you all sit around a grill, open flame, and grill and eat as much as you can. I've only been once. It was WAY to much meat for me, not enough vegetables. But I fell in love with kim chi. Fermented spicy cabbage.
I found some at my grocery store. At almost $5 a short jar it was a rare treat (not to mention it went really fast and not always stocked!). I would eat it in a day if I let myself.
I have IBS, and I was concerned that I might be negatively effected by eating so much at once! It turns out not! It's really good for you and aids digestion. No wonder Koreans eat it a lot!
I figured I'd try making it.
I used this recipe. There are a lot of different versions, and this one seemed simplest.
ingredients:
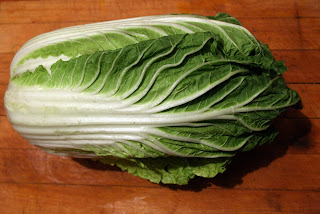

First you cut the butt end off. I forgot to take a photo, but please take note of the pretty pattern the end makes!
Rinse the leaves in cold water.
(this part sucked 'cause we keep our apartment pretty cold 'cause electricity costs so much!)
Pack 'em in a bowl and cover with cold, salted water. Put a plate and a weight on top and stick in the fridge over night.


Chop up your green onions, garlic and ginger. I did more than the recipe called for. I had a big cabbage. In retrospect, I would have used less ginger and green onion.


I blended all the ingredients because I don't chop very fine. It made it much easier to spread on the leaves.
I didn't take photos of this next bit...it was too messy! I spread a small amount of the paste on each leaf and shoved them into a big jar. I might try chopping the cabbage first next time and just kinda tossing it around...
You don't have to put a lot on each leaf. When it starts to ferment it all gets yummy.
I used two jars and 2/3rds of the cabbage.

Stick the jar somewhere not cold. Warm room temp. (that means for my cold apartment I put it about a foot away from a heater! The jar never got warm.)
Then you wait 3 or 4 days.
If you have a sensitive nose...um...beware. When you open the jar, it smells like old garbage feet. J came home from a weekend away and exclaimed "wow! it stinks in here! didn't you take out the garbage?"
So, don't open it the day you have company...unless maybe they are Korean...they might enjoy the smell as much as I do...
I wasn't thrilled with the results. I think it had a lot to do with too much ginger and green onion, and maybe not enough marinating time. I've put it in the fridge and left it alone, and it's better.
I also made kim chi soup. OH DIVINITY! So good. I used this recipe and added shitake mushrooms. I got so excited I didn't take photos of the finished kim chi or the soup. Next time!
It is my hope to post a tutorial once a week.
From cooking to crafting to gardening to space travel...
today...KIM CHI!
J (the husband) took up to Korean BBQ.
Have you ever been?
It's all you can eat grilled meat and fish. they give you sides of kim chi (kim chee, kimchi), spicy potatos, and rice. you all sit around a grill, open flame, and grill and eat as much as you can. I've only been once. It was WAY to much meat for me, not enough vegetables. But I fell in love with kim chi. Fermented spicy cabbage.
I found some at my grocery store. At almost $5 a short jar it was a rare treat (not to mention it went really fast and not always stocked!). I would eat it in a day if I let myself.
I have IBS, and I was concerned that I might be negatively effected by eating so much at once! It turns out not! It's really good for you and aids digestion. No wonder Koreans eat it a lot!
I figured I'd try making it.
I used this recipe. There are a lot of different versions, and this one seemed simplest.
ingredients:
Napa cabbage - approximately one pound
4 cups of cold water
3 tablespoons of sea salt
1 tablespoon of fresh garlic, finely chopped
1 tablespoon of fresh ginger, finely chopped
1 tablespoon of fresh green onions (scallions), finely chopped
1 teaspoon of dried red chili pepper flakes (more if you like things spicy, less if you don't)
1 1/2 to 2 teaspoons of sugar
4 cups of cold water
3 tablespoons of sea salt
1 tablespoon of fresh garlic, finely chopped
1 tablespoon of fresh ginger, finely chopped
1 tablespoon of fresh green onions (scallions), finely chopped
1 teaspoon of dried red chili pepper flakes (more if you like things spicy, less if you don't)
1 1/2 to 2 teaspoons of sugar


First you cut the butt end off. I forgot to take a photo, but please take note of the pretty pattern the end makes!
Rinse the leaves in cold water.
(this part sucked 'cause we keep our apartment pretty cold 'cause electricity costs so much!)
Pack 'em in a bowl and cover with cold, salted water. Put a plate and a weight on top and stick in the fridge over night.


Chop up your green onions, garlic and ginger. I did more than the recipe called for. I had a big cabbage. In retrospect, I would have used less ginger and green onion.


I blended all the ingredients because I don't chop very fine. It made it much easier to spread on the leaves.
I didn't take photos of this next bit...it was too messy! I spread a small amount of the paste on each leaf and shoved them into a big jar. I might try chopping the cabbage first next time and just kinda tossing it around...
You don't have to put a lot on each leaf. When it starts to ferment it all gets yummy.
I used two jars and 2/3rds of the cabbage.

Stick the jar somewhere not cold. Warm room temp. (that means for my cold apartment I put it about a foot away from a heater! The jar never got warm.)
Then you wait 3 or 4 days.
If you have a sensitive nose...um...beware. When you open the jar, it smells like old garbage feet. J came home from a weekend away and exclaimed "wow! it stinks in here! didn't you take out the garbage?"
So, don't open it the day you have company...unless maybe they are Korean...they might enjoy the smell as much as I do...
I wasn't thrilled with the results. I think it had a lot to do with too much ginger and green onion, and maybe not enough marinating time. I've put it in the fridge and left it alone, and it's better.
I also made kim chi soup. OH DIVINITY! So good. I used this recipe and added shitake mushrooms. I got so excited I didn't take photos of the finished kim chi or the soup. Next time!
Friday, January 7, 2011
the pig and the pom pom
one of my favourite gifts this Christmas was a salt pig! with pink Himalayan salt. I could just eat it on it's own...thats how good it tastes!

and here is a tutorial on how to make pompoms! this was *my* first time...so...


*edit*
I was asked why it's called a pig, I guessed the shape slightly resembles one...but it's because "Scots and northern Brits way back when used the word "pig" to refer to a pot, jar, crock, or earthenware vessel. "
and here is a tutorial on how to make pompoms! this was *my* first time...so...

first you cut 2 (TWO) circles of card stock (cereal box would work) a bit bigger than you want your pompom. cut a hole in the middle of each about half the size (so if your circle is 3 inches...the inside should be 1.5 inches) I have no idea how much yarn you use!! I brought the 'doughnuts' halfway between a bunch of yarn (leftover from a gift (revealed tomorrow or Sunday!)) and started winding!

I just kept stuffing it in. You wind until you cant fit the yarn though anymore.

Then, you slip scissors in between the two cardboard circles and cut around.

Slip a long piece of yarn between the circles and pull tight. I made a reef knot a couple times after winding. wind once, knot, wind again, knot. leave a tail for attachment.

the pompom might be a little shaggy, so give'r a trim (I trimmed onto an open book to catch the fluffs)
A knotty joke:
A rope walks into a bar, and the bartender says, "I'm sorry, um, we don't serve ropes here!" So the rope walks out all disgruntled. He sits on the curb thinking for a bit, and has a light bulb moment. He ties a knot at the top and messes up the end a bit, and walks back into the bar. the bartender rudely says "HEY BUD! didn't I say NO ROPES ALLOWED!!??" and the rope replies "I'm a fayed knot!"
Monday, January 3, 2011
day planner
By trade I'm a gardener...or a "horticulture technician". So I work about 8 months, generally April-end of November/beginning of December. Then I go on EI (employment insurance) for December-March. When I am working, my mind is focused and I know exactly what day it is and what is going on. My brain this past month has gone to mush! days? the date? (ie, my previous post ...oh, it's NYE!?). I declared I needed to get a day planner!
but they are 'so' expensive...for something I will use for a year? sure. I could go to the dollar store...and some of them are kinda cute...but made in China...I try not to buy from China, I'd rather source Canada, or even better, Toronto. I generally don't mind paying more for local, but since I'm on EI, money is tight...
SO...what is a crafty girl, who has too much time on her hands do? MAKE ONE! out of reused items...AKA, upcycled items! A new term I learned recently.
My new boss gave me some gardening mags this year. I ripped out pages that I had read, and where pretty. I generally was able to use 3 pages for a month. 5 weeks, plus the month page.

I folded them into 4. using double sided tape, I stuck the 'wrong' sides together, in half.

I made two holes on the folded edge.

for the days, I used label stickers I had, (I didn't want to buy anything new)
 I made a little booklet of each month, cut covers out of card stock, and tied it all up in ribbon.

 AND. I ran out of stickers! I happened to have old (one from '96 !!!!!) calendars. (I keep them if I like the pictures, to make cards/wrap with) I cut out the days that had no writing on them, and used a glue stick to stick 'em on

 It was all kind of random and slapped together...but I love it. I want to make more for next year, and better, for gifts. (give me your 2010 calendars! Maybe you'll get one for Christmas this year)
but they are 'so' expensive...for something I will use for a year? sure. I could go to the dollar store...and some of them are kinda cute...but made in China...I try not to buy from China, I'd rather source Canada, or even better, Toronto. I generally don't mind paying more for local, but since I'm on EI, money is tight...
SO...what is a crafty girl, who has too much time on her hands do? MAKE ONE! out of reused items...AKA, upcycled items! A new term I learned recently.
My new boss gave me some gardening mags this year. I ripped out pages that I had read, and where pretty. I generally was able to use 3 pages for a month. 5 weeks, plus the month page.

I folded them into 4. using double sided tape, I stuck the 'wrong' sides together, in half.

I made two holes on the folded edge.

for the days, I used label stickers I had, (I didn't want to buy anything new)


Subscribe to:
Posts (Atom)